

While we did surface some critical bugs, it took almost a full weekend to write up all the tests that needed to be done, and then another weekend (at least!) to run through the testing for Mautic 3 alpha.
We need to find a better solution to ensure that we're doing robust testing when we are shipping new releases of Mautic. I'd heard Codeception and acceptance tests mumbled about and seen it in our documentation that we had acceptance tests, so I started digging!
It turned out, we had two – can you log in, and do you see the dashboard when you're logged in …. a starting point at least!
Here follows my journey over the last week or so learning Codeception and starting to write my first acceptance tests for Mautic. I'm sharing in the hope that it helps guide others in getting set up to join this project, as it's very much needed!
Installing Selenium Standalone Server and Chrome WebDriver
Depending on your computer, you'll need to install the Selenium Standalone Server and the Chrome WebDriver. We have some basic documentation on how to set up Selenium Standalone Server (the homebrew instructions were super simple to follow if you're on a Mac), I also found this article on how to get started with Selenium and WebDriver on Ubuntu helpful getting set up on Linux with the caveat that I had to select Java 8, not 11, to run Selenium Server using the following command:
sudo update-alternatives --config java
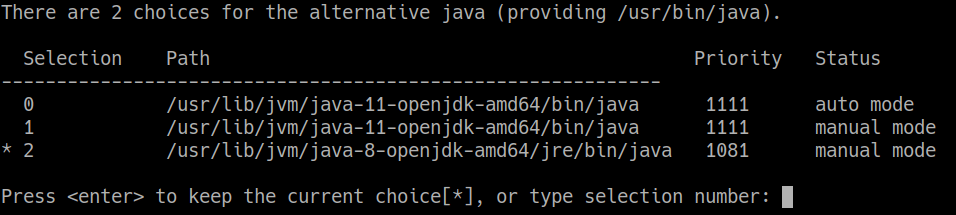
Enter the number which relates to Java 8 – in my case, 2, and press enter. This will set your default Java version to use 8 rather than 11.
Downloading, installing and configuring Mautic for testing
Once you're set up, create a testing environment which is specifically for automated tests. You will need to clone Mautic from the Git repository, as the test folders we need to use are not available in the packaged releases.
Here's a step-by-step of how to do that! I have included how to clone down Mautic from Github and install Composer, because as a newbie I found these steps were often missing in tutorials and assumed as something that I already knew!
1. Create a fork of the main Mautic repository
This is standard best practice when you're going to be making a pull request – and I am presuming at some point you might want to write tests for Mautic.
Making a fork of the main repository gives you a copy which has been split off from the main repo at that specific point of time. You can then work on this, and in the future, request that your changes be brought back into the main repository using a Pull Request.
Start by going to github.com/mautic/mautic and clicking on 'fork' at the top right. This will warn you if you've already got a fork set up – if you're not using it any more (for example it might have been created a long time ago for testing) you can delete it by opening the fork, going to settings, and scrolling to the bottom of the page.
Once you have your fork set up, you can access it at github.com/yourusername/mautic. Now you need to bring the fork down to your local computer, so that you can run and create tests.
I'm assuming you have a localhost environment set up – if you don't you might consider setting up with DDEV which is quite popular in our community.
2. Clone the repository to your local machine
To clone the repo, you need to have Git installed on your machine.
If you have an SSH key set up with Github, you should be able to clone using the SSH link, if you don't you'll need to enter your username and password (or access token if you have 2FA set up).
SSH is a much easier way to work with Github and saves a whole lot of time. I really recommend taking the time to set this up – see this article from Github on using SSH keys for a walk through of how to add an SSH key to your Github account.
It's also worth noting that as you use SSH more, you might want to set up an SSH config file which makes it easy to specify particular keys for particular purposes, and to create short names to connect to servers (e.g. ssh my-server) rather than having to remember the IP address, user, port and SSH key to use.
To get the link you need to clone the repository, click 'clone or download' on your fork.
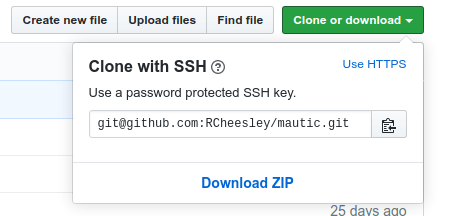
This shows the SSH link – if you need to use HTTPS then click the 'use HTTPS' link to get the appropriate link.
In a terminal window on your computer, navigate to the directory on your localhost where you want to install Mautic.
Remember that cloning will install to a directory called mautic, so when you set up your vhost, ensure you include this in the document root path.
Type the command to clone down from Github:
git clone <your link>
Replacing <your link> with the link you copied from Github.
3. Run composer to install dependencies
Once downloaded, you'll need to run Composer to install the dependencies that Mautic relies on. Do this with the following command:
composer install
if you don't have Composer installed yet, head over to getcomposer.org - also worth noting if you use a tool such as XAMPP for your localhost setup, you may need to do some additional work to ensure that it works with the command line version of PHP – there are lots of results in search engines for how to do this depending on your operating system.
Now you have Mautic installed, browse to the URL on your localhost and go through the Mautic installation process as you would for any install. Don't worry too much about the admin user as this will be overwritten in the next step.
4. Install sample data
Finally, install the sample data by running the following command in the Mautic root:
php app/console mautic:install:data
Note that this will erase any data existing in your Mautic instance, and will create an admin user with the username admin, password mautic.
This step is important, because we require the dummy data and the admin user in order to run the automated tests.
Configuring Codeception
Now we have a working Mautic instance ready to go, we need to configure Codeception to tell it how to access our Mautic instance for running the tests, and what parameters to use when it is running tests.
Edit the following file:
/tests/acceptance.suite.yml
Note, if you do not have a /tests/ folder in your Mautic instance, you probably did not clone it from Github. Please jump back a few steps and follow the instructions above!
This file allows us to tell Codeception how we want it to carry out the tests in our acceptance test suite.
There are a couple of crucial settings you will need to configure including the URL of your Mautic instance, and the window size for testing (I found that Codeception defaulted to testing in a mobile-sized environment which isn't representative of the Mautic userbase, so had to specify the window size).
I also found on some environments I needed to set w3c:false under chromeOptions per this StackOverflow article.
actor: AcceptanceTester
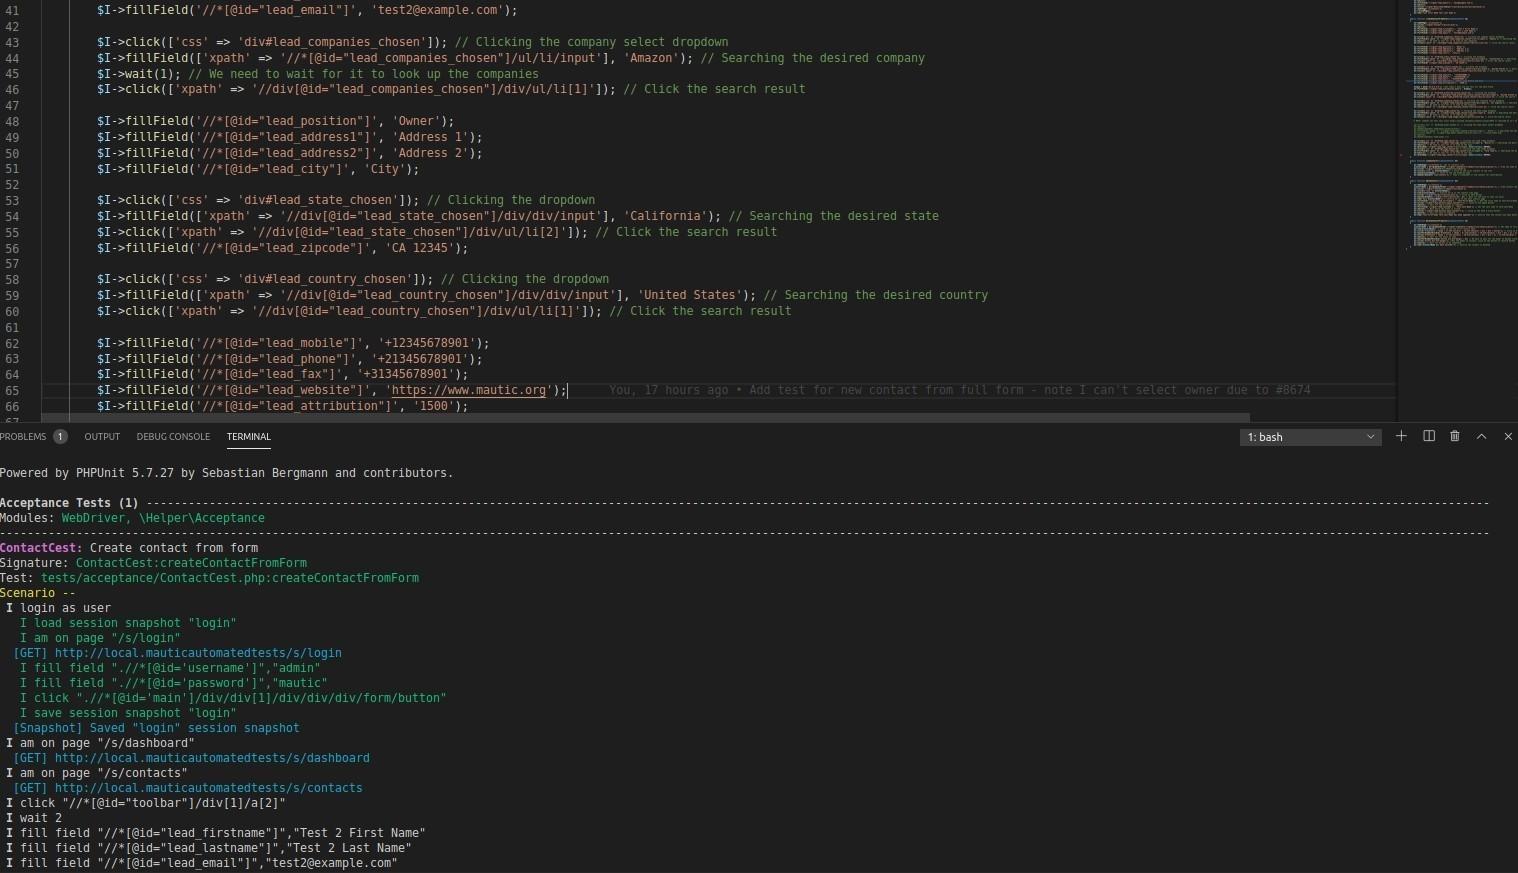
Running existing tests
To begin running your tests, you will need to ensure that the Selenium Web Server is up and running, and you'll also need to ensure that the WebDriver is running. You should find the documentation for both in the documentation mentioned earlier. If you experience any errors, do a search for them and you'll likely find the solution.
Once Codeception is configured and the Selenium Server/WebDriver are running, change to the Mautic root directory in your terminal, and run the following command:
bin/codecept run acceptance
This will run the acceptance tests that are currently found in the tests/acceptance folder. You can decide to run specific tests using the following arguments:
bin/codecept run acceptance ContactCest.php
This will run only the tests in the ContactCest.php file
bin/codecept run acceptance ContactCest.php:^createContactFromForm$
This will run only the createContactFromForm test from the ContactCest.php file.
If you want to see a more verbose step-by-step output or see details on any errors occurring, use the debug flag
--debug
I found this super helpful when I was actually writing the tests, as it helped me to track down exactly where the problem was or what the error was being caused by.
Resources for learning Codeception
Here are some resources I found useful and tips I came across when learning about Codeception and how to write automated tests.
Learn about XPath – it's awesome!
I had not really come across XPath before I discovered Codeception, but now I absolutely love it and will most definitely be learning more about it and using it more often!
I had seen it in tests but had no idea how it was generated – until I realised that right clicking on any element in the Chrome console and going to Copy gave me an option of 'copy XPath' ….. so that's where I'd seen it before!
Take a look at this article for a clear explanation of how it works.
The power of XPath and the ease with which you can identify the appropriate elements using Chrome Developer Tools makes it my #1 recommendation. You don't have to fully understand how it all works, but getting familiar with using it in your tests is highly recommended!
Codeception documentation
The most helpful resource has been the Codeception documentation. It is well laid out, contains useful examples and while it makes some assumptions about your technical knowledge, I mostly found it easy to follow as a non-developer.
Start with the Introduction and then jump on to Acceptance Tests. I also found the section about Reusing Test Code helpful! All the possible actions you might need to use are listed in the WebDriver module documentation.
Just get started!
Once you've been through the documentation, my best advice is to just jump in and start writing. Take a look at the existing tests as a steer for the basics and re-use where you can.
I picked a bundle to start with which I knew would be relatively simple to test – I suggest doing the same!
Getting help when you're stuck
You'll inevitably come across some challenges along the way, and my experience has been that there isn't an awful lot out there in the realms of tutorials, blogs or guides (at least I wasn't finding them in my searches) so I almost always reverted back to StackOverflow. Feel free to ping me if you're stuck on something, I might have come across it myself!
Use Codeception (or Selenium if nothing comes up!) <what you're trying to do/error you've got> and you'll most often find some pointers. Don't forget to up-vote if you found them helpful, and drop those URL's into your notes for future reference!
Writing new tests
At the moment the test suite is pretty limited. I have started writing a batch of tests for the Contact bundle, but we have many more that need automated tests to be written!
If you'd like to write some tests, I'd recommend first dropping a message in #t-product on Slack, and making sure nobody else is already working on that area.
Creating a branch on your fork
Make a branch from your fork, using the command:
git branch acceptance-tests-<bundle you're working on>
Then check out your branch using the command
git checkout acceptance-tests-<bundle you're working on>
As you are working on your tests, ensure you add any new files using the command:
git add <filename>
And then commit them periodically using
git commit <filename> -m "what you're committing">
At the end of each day, or when you want to save your work (e.g. if you're finishing working on it for a time) ensure you push your changes up to your branch using the command:
git push origin acceptance-tests-<bundle you're working on>
Creating a new test
To start working on a new batch of tests, you will need to create a new Cest file. Use the following command:
bin/codecept generate:cest acceptance <name of bundle>
This will create a new, simple Cest file in tests/acceptance from which you can commence writing your tests. I went with Cest files as they have more functionality than Cept files, particularly as your tests get more complex. They are a bit more complex for non-developers, but apparently it's worth it in the long run!
Reusing code
You may wish to use the StepObject in the _before function to check for existing sessions or log in, using the following:
public function _before(\Step\Acceptance\Login $I)
{
$I->loginAsUser(); // Check for existing session or log in
$I->amOnPage('/s/dashboard'); // Go to dashboard
}
Making a pull request (PR) with your completed tests
When you're at the point where you have written all the tests for the bundle you're working on (or perhaps you've written all the essential tests, and want to push those up to the main Mautic repository for inclusion in the next release) go to your fork, and you'll see a button to commence a Pull Request.
Click the green button, follow the steps, explain in the description and title of the PR what the tests are covering, and then submit your PR for consideration.
I'm looking forward to seeing your contributions!


